
Cannabis cultivation is both an art and a science. A lot of cultivators use different techniques to maximize their yield. But the work of a cultivator does not stop after harvest; every cannabis cultivator should know how to dry weed and then cure them to make sure that they are up to the quality that the consumers want. Properly drying and curing your cannabis is an essential and integral task in making sure you are making a profit. It is a delicate process that involves an intricate procedure. This will also test the cultivator’s finesse in making fine buds that have high-quality taste and aroma.
Most newbies tend to interchange two of the most common terms used with cannabis. Although the purpose of drying and curing overlap each other, their true definition is very definitive. Drying is a procedure wherein the fresh buds are dried to remove the excess moisture. This makes the buds ready to be smoked or vaped. Curing involves the process of storing your buds for several weeks to allow them to sit on their flavor and aroma.
A lot of discussions are made after the cannabis harvest season. But what is truly worth discussing over is the reason why we need to dry and cure cannabis. Drying cannabis prevents mold and bacterial growth from the excess moisture from the plant material. This allows the weed to be properly cured. This also extends the shelf life of the buds. Curing the cannabis maximizes the quality of the buds. It helps release the flavor and realize the potency of the strain. Through curing, you can easily determine and optimize the flavor of the buds and help make a smoother smoke.
Once the buds are harvested, you will always want to dry your cannabis almost immediately. You have to prepare the area where you dry your weed first. Make sure that the environment has a lot of airflows, which allows proper air circulation from all sides. This way, you always get fresh air from different angles and allow ventilation to do its part in the process of drying. The main objective of drying cannabis is to protect it from mold and bacterial growth without compromising the quality of the buds.
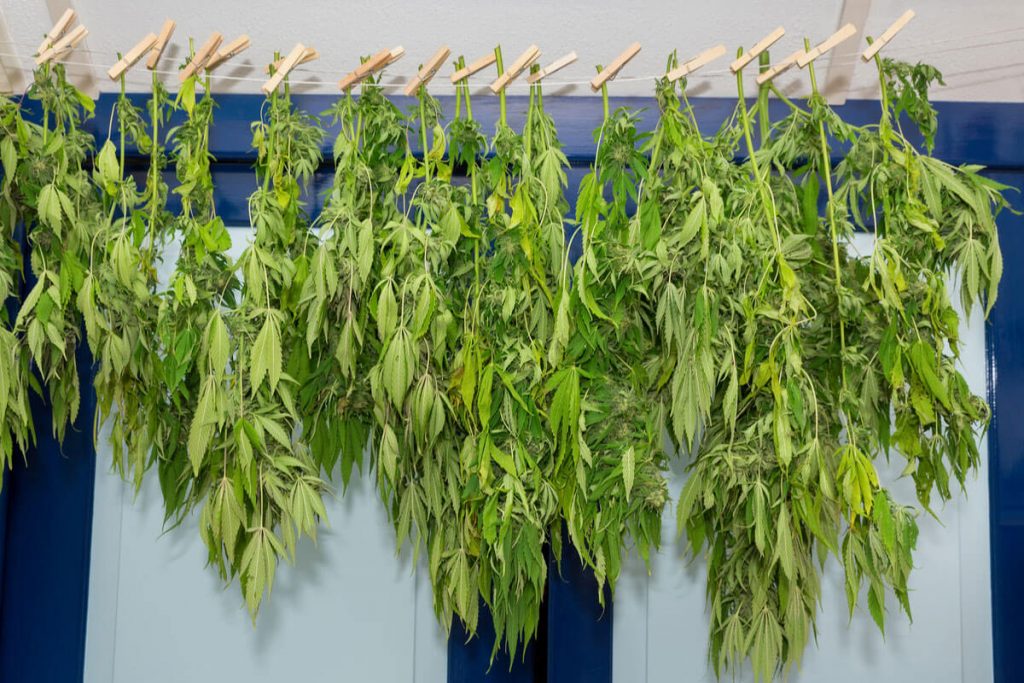
1. Once the trimmed buds are available after harvest, prepare a wire rack where you can hang the trimmed branches or individual buds. You can also use strings to hang the branches over.
2. If you are using wire racks, make sure to flip the branches or buds regularly, so they do not flatten. You will also need to do so to promote airflow from all sides of the buds. In this stage, you need to make sure that you prevent any contamination of the buds. Use disposable gloves when handling the buds and avoid any substances that may get to the buds that could harm the entire process.
3. It is highly advised that you place your wire racks inside a dark room with lots of ventilation and a humidity level of around 55%. This should be a separate room from the rest of the facility, and there should be a limited number of people who can get in and out of this area. This way, you prevent any cross-contamination from outside of the room.
Light tends to increase the temperature of the room, which causes moisture to evaporate rather quickly. This also affects the normal process of drying cannabis; hence a dark room should be more conducive to this procedure.
4. It will take around 7 to 12 days for the buds to dry thoroughly. This can depend on many factors, such as the size of the buds and how you trim the plants. If you are drying cannabis with the branches still intact, it will also take longer than expected as branches also contain water in them. Temperature, humidity, and air circulation play a huge role during the drying process, so make sure to control them as much as you can.
5. After the recommended drying time, you can determine whether the buds are completely dry by taking the dried branches and snapping them. If they snap, they are dry and ready for the next phase. If the branches bend, you will need more time to dry them out.
6. Curing the buds will involve storing the dried buds in container jars, where they are filled about 3/4 of the overall size of the jar. Space will be left for air, which will greatly reduce the growth of molds and bacteria.
7. Once done, store the jars in a dry and dark place, which is separate from the room that you’ve used for drying. Check the buds from time to time or at least once a day for the next two weeks.
8. Always check for mold growth when checking your buds. If you find molds growing on your buds, be careful and remove it from the jar before it infects everything else. The process will also allow new and fresh air to enter the jar making for better airflow for the buds.
9. Most curing procedures tend to go around for a month and can extend up to the next month. The ideal time to cure your dried cannabis for that extra bit of flavor and aroma should be around 4 to 8 weeks.
10. After two weeks, you can then fully enjoy using your dried buds. You can either smoke them directly or use them as ingredients for food and edibles.
For those who have issues with drying and curing their buds, you can purchase humidity packs that will maintain the humidity levels of a certain area to help rehydrate your buds in case they are overly dried. It’s a great investment in how to dry weed perfectly without going overboard. Once you’re done with drying and curing your buds, simply store them in the same place where you cured your buds and always check on them as frequently as possible to let air in and molds out.